 |
| The new gaming mat |
Well, not all of it was done in two days of course, only the gaming mat. It is not my first one, you can see other mats I have made at our clubs homepage (here). But since I never have written a tutorial in English, I'll use the oppertunity to write one this time.
The first thing you'll need is a large piece of canvas. I know mats can be done with other, cheaper materials, too, but I have found canvas to be both durable and solid - which it needs to be when you place something under it later on to create hills. I buy the canvas direct from the wholesale trader in a large roll. This gives me near unlimited material to do some more mats in the future - much to the distress of my sweet wife.
Lay out the canvas flat on your table and fix it with something - it will later constrict and you'll need to keep it in place. I have some holes in my gaming table for this purpose to which the canvas is fixed with large screws.
 |
| Step 1: Lay out the canvas and fix it with something - in my example with screws |
 |
| I have reinforced the anchoring point with a slice of metal |
At this point it is important that the canvas should be bigger than your mat will be later on - it will be easy to cut off excess material, but if you cut the material to size to early, the constricting will cause size-problemes later on.
The basic material from which the mat is made is acrylic paste, which can be bought cheap at your local DIY (use the cheapest/ white one), paint and sand. The paint is as well from the DIY - the cheapest and biggest pots of acrilyc paint you can buy in all colors associated with earth, mud and groundwork. Mix a large pot with paint and some water, and add first sand and than acrylic paste. You will at least need four tubes of acrylic paste for a mat 180x120cm.
 | ||||
| Step 2: Arrange what you will need and prepare a large amount of paint in a container. This will get messy, so best use something as a container that you can throw away later - like the bottom of a water conatiner I have used here. |
 |
| Put in the acrylic paste and birdsand and mix them thoroughly - medical gloves that can easily discarded come in handy |
 |
| Best not to show the result in too big a picture - I know what it looks like, but it smells better... |
Now the fun begins - spread out the mixtures on your canvas. Use your hands here - I have experimented with all sorts of brushes, scrapers and spatula, but the material will stick to your tools instead of the canvas. So use your hands wrapped up in medical gloves. It is really messy, so you best enjoy it.
For my mat I wanted a road, some fields and a village, so I first I blocked in these areas with the dark mixture...
 |
| Step 3: Bring the acryl-sand-paint - mixture to the canvas (I really don't know why the scraper lies there - it has not been used during the process) |
... and then I put the other material around it. Obviously if you want a more generic mat without fixed geographic features you don't need to mix several shades, just use one big container. But I'm not a fan of superimposed flexible roads, and this mat is especially made for 28mm skirmish games (well, for DUX Britanniarum, to be honest).
 |
| Use your hands (best in gloves) while spreading the material, and be careful not to spread it on the floor and your clothes - I know it will happen anyway but don't say I have not warned you ;-) |
Now you want to be fast, because the next step has to be done while the mixture is still wet. Apply now static grass in different shades, little rocks and bushes, colored sand - everything you have at hand. If you do large areas it works good to throw the material up in the air - it will rain down evenly and give a more natural effect. In my case I had to be more careful, because I did not want too much flocking material on the road. Note that you don't need glue - just cover the whole surface as quickly as possible für the mixture to be sufficently moist and sticky.
 |
| Step 4: Use every flocking material you can lay your hands on. If you are just a little bit like me, you will have an ample supply of it. |
At this point you should have noticed why it is a wise move to wait with this project until you have the house for yourself. Should you still think your partner is tolerant enough to try it anyway, you'll break the limit at the next step of the process. But before that, put in a few hours of movies and/or sleep. The acrylic paste has to dry, and it best does this with an open window.
Now if everything has had time to dry up thoroughly, you can see why it was important to leave some excess-canvas all around the surface and especially why it is important to fix the canvas to the table. The drying acryl will constrict and has quite a force in doing so - if you forgot to fix the canvas, you will by now probably have a little shrunken ball in the middle of your table instead of a flat canvas.
Anyway, the material is dry now and you can use a very sharp stanley knive to cut away the borders which will leave you with a neat mat in the required size.
Then comes an interesting part from which depends whether you can spent the rest of the day gaming or cleaning the house. The excess-material has to be shaken off the mat. What I do is lift first one half of the mat and jiggle it, than the other half, and then I pour everything that has accumulated in the middle in a container. It is good to get as much of the material back as possible, as you can use it the next time. Afterwards I roll up the mat (yes, you can do that), carry it outside and give it the treatment of an old carpet.
 |
| Step 5: Shake off the excess-flocking material and repair a few parts with paint and glue + flock, then your are done |
Well, that was it. Know you can use your mat, and you can roll it up for storage. For rolling up I propose using mantling material for pipes - this is soft and durable.
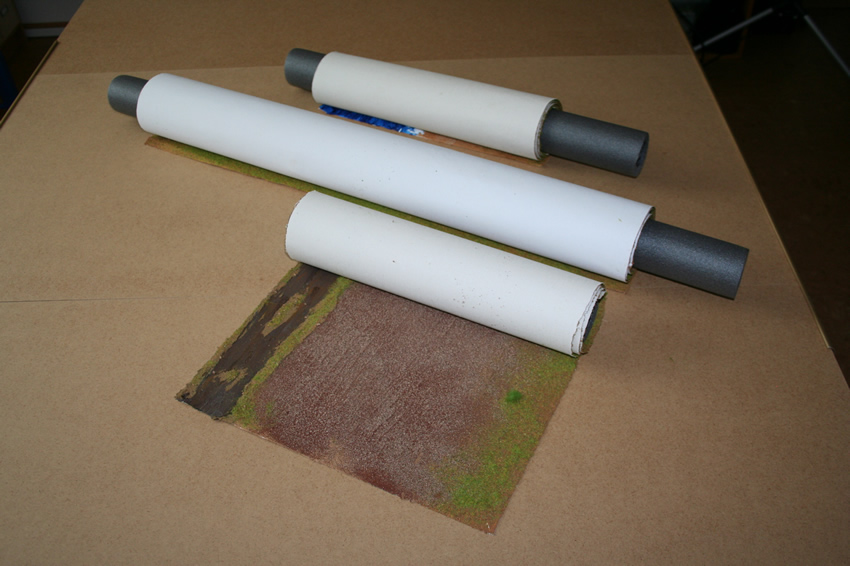
The good thing about gaming mats is not only that they look beautiful and are easy to store and transport, but that you can simply put books or similar under it to get naturally looking soft hills - like I did here underneath the wood in the background. Now the thick material of the cancvas comes into play - it is so durable that it will carry your miniatures even if it is stretched between table and book and has nothing but air underneath.
 |
| Some books under the trees make for a soft hill |
Some parting shots of the landscpae - I really like how this has turned out.


I hope you like the result, too. Next will be more pictures with some miniatures in it. Thanks for your visit and have a nice day,
Tobi
Welcome to blogger! I'm honoured to be your first follower!:-) It looks fantastic!!
AntwortenLöschenWhen you follow others try and leave a link back to your blog so they can follow you. Do this in your follower section as I had to search to find yours.;-)
Cheers
Christopher
Many thanks, Christopher, the honour is mine!
AntwortenLöschenThe first layout I've used didn't have the option to show the sidebar with follower section and blog list, it was all hidden in the "flexible sidebar". It looked very tidy (which is exactly the opposite of my painting table ;-) but as you've completly accurate have pointed out everyone has to search for it - so I've changed the layout.
I'm not sure about the title-section, maybe I'm going to include a picture there. But at the moment I'm going to focus on the content, and a blank paper is not the worst way to start a new project...
Take care and thank you,
Tobi
Oh my, what a wonderful terrain mat you scratch-built. Very, very impressive. Dean
AntwortenLöschenDas ist ja Geil!
AntwortenLöschenI´m not very good at creating a wargaming area, space is a factor and this is an excellent solution. Very good tutorial and a great idea.
Cheers
paul
Many thanks for your kind comments, I really appreciate them. Next will be some more pictures of the mat together with my new Dux Britanniarum army. A few figures need to be finished before that though. Best regards, Tobi
AntwortenLöschenFantastic tutorial! I've been looking for something like this over plain "grass" gaming mats; many thanks for describing the process.
AntwortenLöschenCdlT
Hi Tobi,
AntwortenLöschennice blog and this tutorial is absolutely what I was looking for! Thanks for that. I´ll try this out, it does look like a messy affair but I´ve got a large basement...
Cheers
Jan
Amazing effort - well done. I recently took the plunge into making some modular terrain boards, when what I really wanted was something exactly like your mat. Again great effort and thanks for the tutorial.
AntwortenLöschenFrank
http://adventuresinlead.blogspot.com.au/
I've finally found it! I've been looking for a tutorial like this for months. The largest gaming area I have in my little apartment is a 2'x 3' kitchen table, so I've been trying to find a way to make a roll-able gaming mat that looks good. I finally found your site in German and tried to piece together the internet translation... but then I found this! A great tutorial, and in English too!
AntwortenLöschenOne quick question: are there any alternative methods for fixing the mat down while it dries? I don't have a table that I can drill holes into. What do you use for your 60cm x 60cm mats?
Punch holes in the canvas, use a piece of sturdy rope through the holes to tie down the ends to the legs of a table or under a larger set of boards.
LöschenThis looks fantastic, and really not so difficult. Thanks for sharing! I'll be trying this out as soon as I'm able.
AntwortenLöschenMany, many thanks for your kind replies. I'm happy you like the tutorial.
AntwortenLöschenMattias, if I had only known I would have written an English tutorial sooner :-) Now I'm glad it has prooven helpfull to you. As for the fixation, you can also use screw clamps, they work very well, too. Please note that they will harm a good table, so bolster their grip with polystyrene or at least several layers of foam material.For small mats like 60x60, shrinkage is not so much of a problem. Here you could even work without any fixation at all, but with a slightly larger surface - so for example use a 70x70 surface and cut it to size 60x60 with a stanley knife after everything has dryed, so you could adjust for a little contraction. That's what I did with those smaller mats.
If you have any more questions please feel free to ask - I really can't recommend this technique enough. The results are just great and have very much enriched my games.
Best regards and have a nice evening,
Tobi
Awesome, Thanks for the advice! Once I get a job I'm definitely going to try this.
AntwortenLöschenmdarrow.blogspot.com
That is just amazing!
AntwortenLöschenHow much material actually comes off during storage and reuse? How durable are they?
AntwortenLöschenOutstanding tutorial, thanks for posting it.
AntwortenLöschenThe naturalistic look of the tabletop is great, and I'm sure it looks even better 'in the flesh'.
Simon
This is a fantastic idea - your tutorial is really well-written and entertaining to read too...I created modular boards myself this summer, however I think doing rolled-up canvas mats like you have is the way forward!
AntwortenLöschenMany thanks for your kind comments and please excuse my untimely reply - I was away on a business trip.
AntwortenLöschen@Ninja: They are very durable indeed. There is a little flock coming off over time, but not much. I tend to use the vacuum cleaner after rolling up the mat and storing them away, but I always have done this with GW-mats, too.
@Simon: Many thanks, yes, the pictures do hardly justice to the real look and feel of the mat. Especially the small hills you can create by putting little items under the mat are lost in the pictures but look very realistic.
@Worldwarshed: Thanks, I'm glad you like it. I have experimented with modular boards myself and I like them, but I don't have the room for storing them - especially since I want it all: Deserts, Snowfields, Meadows, ... It takes much less room doing this with mats...
Great work, your matt looks fantastic.
AntwortenLöschenAll the best
Airhead
Many thanks, I'm glad you like it.
LöschenImpresionante descubrimiento el de tu enlace, muchisimas gracias por compartir tu sabiduria con los demas.
AntwortenLöschenMany thanks for your kind comment - and I'm grateful for the link to you blog which is very fascinating indeed.
LöschenThis terrain piece is very inspiring. Thank you for sharing your effort and providing some instructions/recipes for us.
AntwortenLöschenWhat exactly is acrylic paste? I was checking Michael's and Jo-Ann fabrics in the USA and wasn't able to track down tubes similar to what you show in your pictures.
Does this material appear to be similar to what you used as your "acrylic paste"?
http://www.liquitex.com/PB2ColMenu.aspx?pageid=1326&id=1295&terms=paste
Many thanks for your kind comment and please forgive me that I didn't answer before - live was extremely busy before and around the holidays. Yet I did some research on the matter you have asked. I'm afraid the paste of which you've posted the link won't work, because it dries hard. I order for the mat to be rollable it has to be flexible after drying.
LöschenIt is very strange that the paste I use seems to be available only in Germany, France and Italy - even the packaging has no English text on it, which is indeed very unusual. Yet I am sure there must be similar products used for joint sealing for floor tiling.
You can see examples of the paste at amzon: http://www.amazon.de/beko-Beko-Acryl-Dichtstoff-transparent/dp/B003NFH0KW/ref=sr_1_1?ie=UTF8&qid=1356638265&sr=8-1 or http://www.amazon.de/ACRYL-A-310-ml-transparent/dp/B001ER8UY6/ref=pd_sim_sbs_diy_1
I'm not sure if this helps, but I wish you luck experimenting! Best regards, Tobi
Great work and great blog, congratulations!!!
AntwortenLöschenI´d like to make my own, following your instructions, but I don´t know if the canvas is a PVC canvas or other material. Do you have a link to an online store which sells this kind of canvas?
Thanks a lot in advance and keep inspiring us!
Many thanks for you kind comment! The canvas is an artists canvas (linen) as it is used e.g. for oil painting. You probably can use PVC, but I didn't use it yet because I'm afraid the paste dries not so well if the surface is water-repellent.
LöschenThe canvas I use is available e.g. at amazon http://www.amazon.de/LEINWAND-ROLLE-100%25-leinw%C3%A4nde-keilrahmen/dp/B001AGPAQ2/ref=sr_1_11?ie=UTF8&qid=1356638807&sr=8-11 or your artist-shop around the corner. I prefer to buy the material on bulk in order to be able to make several mats, but if you only make one mat it would be better to buy the exact size you need.
Very best regards, Tobi
Hi.
AntwortenLöschenIt´s great!!!
I found your german site a time ago and got stunned, but now i can read and understand it, with more fotos!!!
Now, I know where can I buy the basic materials here in Spain. I want to do a desert one.
Which flocks and sand did you use for your libian mat? I´m in love with it since I saw it.
Is there any problem with the sand or rocks to attach it to the acrilic paste or it will do it well?
Many thanks.
Pedro.
Many thanks for your kind comment, Pedro. I'm glad you like the tutorial. Yes, the Lybian Mat is still one of my favorites too and I'm planning to do it again in a larger scale as one of the next projects in 2013 (I'll keep you informed). As flock I have used burned gras from Mini Natur and Noch (model railroad) - only different shades of brown and yellow. I wouldn't use green - but a very bleached green could work. Sand and rocks are no problem at all, they stay very well on the mat. But I would recommend to spread the rocks (cat litter works well) AFTER spreading the sand-color-acryl mix instead of mixing them into the paste right away - with rocks in it, it will be much harder to spread the mixture evenly on the canvas. I wish you good luck and much fun with your project and would be happy to see the result. A happy and healthy new year to you, take care, Tobi
AntwortenLöschenMany thanks and my best wishes for you too.
AntwortenLöschenGreat help, but now I have some more questions :)
- Which color(paint) did you use for that mat? I´ve always seen a dark paste in every example. It was yellow, light brown or...?
- Did you scatter sand or earth as flock or there where sand only in the paste?
- For the ground, not the bushes, did you use sawdust or fine turf as flock or only grass?
- Did you highlight (brush) at last?
That´s all :P
Many thanks again and please excuse my insistence.
PD:
I´ve seen the post in the german forum where I discovered your work is active again. I´ll introduce myself there, ask some questions too :) and hope that soon I´ll show my own work.
Hi Pedro, I was ill, hence the delay in my reply. So many questions ;-) Okay, as color I've used a mixture of ochre, off-white and sand - just any color that I had a feeling would look right in Syria. The sand was in the paste, I have scattered very few sand and a few rocks afterwards, too. The grass on the ground was brown grass from NOCH (miniature railways). A very thin highlight in off-white was applied afterwards, but only on a few patches of the mat - don't overdo this or it looks "patchy". I hope this helps, good luck with your project! Best regards, Tobi
LöschenThis is a great tutorial and something i will definitely try. Just a quick question about the paste. I'm in the UK so cant get the version you use so will have to source something here. What is paste you use normally used for? Is is some kind of wallpaper paste for example?
AntwortenLöschenMany thanks for your kind comment. The paste is called universal acrylic sealeant in UK and it is used for sealing bathroom tiles. If you don'T mind a little advertising for Amazon, you can order it there:
Löschenhttp://www.amazon.co.uk/gp/product/B000TAVWR6/ref=ox_sc_act_title_3?ie=UTF8&psc=1&smid=A19V3JSEZ1HWPK
I haven't tried this specific brand, but it seems to be perfect for the job. If you plan several projects and don't mind ordering overseas, I can recommend this these (I have used them and they work fine):
http://www.amazon.de/Kartuschen-Universal-Acryl-Dichtstoff-wei%C3%9F/dp/B002U05M1U/ref=sr_1_4?s=diy&ie=UTF8&qid=1373115977&sr=1-4&keywords=acryl+wei%C3%9F
Please let me know if I can be of further help. In the meantime I'm looking forward to hear from your mat-making experience.
Take care,
Tobi
Thanks for the quick reply Tobi that's a big help. I'll stick a link on here when i manage to finish the first one. I'd like to think i would get one done within a month. Thanks again.
AntwortenLöschenThanks for posting your process! I tried out these techniques this morning. It worked great. I ended up using a painter's canvas drop cloth, I didn't notice any difference. Thanks again!
AntwortenLöschenThanks, Derek, for your kind comment. I'm glad you like the technique and that you've had good results with your own mat!
LöschenHi mate,
AntwortenLöschenBrilliant tutorial well written and presented, pictures a big help.
How long did it take to dry before you could roll it up.
Are there any more pictures of your mats.
Many thanks.
Hi David, thank you for your kind words. I'm glad you like the tutorial. More pictures can be found on my old blog (http://paintpot.ulmer-strategen.de/?p=200) and in the current issue of Wargames Soldiers and Strategy.
LöschenLeave it to try for a full day, otherwise it will break.
Best regards and hav joy creating a flexible mat, Tobi
I love this and I want to try it out. Do you use a heavy weight canvas or Mid-weight canvas? Cotton, Acrylic Primed or Unprimed canvas?
AntwortenLöschenSometimes our hobby with all its focus on neat detail needs a counterweight - that is big, messy work. With my new army for DUX Britanniarum ... klaviermatte.blogspot.de
AntwortenLöschenThere are seven races in TERA; it is The Aman, The Baraka, The Castanics, The Elins, The High Elves, The Humans, and The animal-like Popori Tera Gold
AntwortenLöschengreat tutorial! i just did a trial version myself and i love it! just need to use more acrylic past on mine!
AntwortenLöschenHere's how it came out!
http://i210.photobucket.com/albums/bb281/amorfatipictures/20151027_172553_zpseadbgeza.jpg
thanks for inspiring!
That's funny I just got done doing a mat as well.
AntwortenLöschenhttp://operationwargaming.blogspot.com/2015/10/flexible-terrain-mat-part-ii.html
http://operationwargaming.blogspot.com/2015/10/flexible-terrain-mat.html
I loved this tutorial so much that I've already created 2 gaming mats like this! however, I now want to create a winter mat with snow on it. Do you have any ideas how you would tackle that? I'm guessing flocking it with snow should/could work, but usually these are expensive as hell!
AntwortenLöschenWaiting for my mat to dry over night. It's such an excellent tutorial. Best of all the tutorials online for making your own mat. This one mixes the paint straight into the caulking. Saves a ton of time. Im making a 3x4 for Saga so it's not that big. I used 1 caulk tube for the base coat. Next day, 2 caulk tunes wired with brown and some black for a deep mud over the top. I didn't use my hands but I used a paint roller. Gives it an awesome texture. The fact that the caulk itself is the glue for the flock saves loads of time. Thanks!
AntwortenLöschenSwtor credits,Gamereasy
AntwortenLöschen